
Ubuntu
One of the solutions would be to mount an USB stick with Ubuntu on it.
After Ubuntu Live is started, boot-repair-disk should be installed.
*How to install:
sudo add-apt-repository ppa:yannubuntu/boot-repair
sudo apt-get update
sudo apt-get install -y boot-repair && boot-repair
Run it through dash or through terminal.
After running "recommended repair", most of the problems regarding GRUB should be fixed.
Taggings:
Chrome on Ubuntu causes kernel panic
This article solves the following challenge:
Chrome on Ubuntu causes kernel panic
This article solves the following challenge:
Chrome on Ubuntu causes kernel panic
This article solves the following challenge:
Chrome on Ubuntu causes kernel panic
This article solves the following challenge:
Chrome on Ubuntu causes kernel panic
This article solves the following challenge:
Chrome on Ubuntu causes kernel panic
The freezing itself would be a classical hint pointing towards some problems with the driver of the used GPU. However there are several things one can do to avoid this very unpleasant system behavior. Chrome, like other modern browsers, has the possibility to fall back on other components besides the regular CPU when it comes to tasks that are not very suitable for it (e.g. graphical processing with the GPU). This option is called “hardware acceleration” and can be deactivated. To do that, you only have to go into the options menu of Chrome, expand the advanced settings and scroll down to the system settings. Uncheck the corresponding checkbox.
This solution works fine, but now Chrome can’t optimize its performance any more using the available hardware. Another option is to target the used graphical driver itself. Therefore open up the Ubuntu system settings, search for “Software & Updates”, switch to the tab called “Additional drivers” and wait for the list to be loaded. Look for the graphic card driver and try a “proprietary” one.
If this problem occurs with the 64 bit version of Chrome, another thing that can be tried, is to use the 32 bit one. I did not try this myself, but I have read, that it have solved the problem in some cases.
Evaluate complexity of present statement:
Select ratingCancelGuessingPassing knowledgeKnowledgeableExpert
No votes yet
Evaluate complexity of present statement:
Select ratingCancelGuessingPassing knowledgeKnowledgeableExpert
Your rating: 3 Average: 3 (1 vote)
Evaluate complexity of present statement:
Select ratingCancelGuessingPassing knowledgeKnowledgeableExpert
Your rating: 3 Average: 3 (1 vote)
Evaluate complexity of present statement:
Select ratingCancelGuessingPassing knowledgeKnowledgeableExpert
Your rating: 3 Average: 3 (1 vote)
Evaluate complexity of present statement:
Select ratingCancelGuessingPassing knowledgeKnowledgeableExpert
Your rating: 3 Average: 3 (1 vote)
Taggings:
Viber for Linux
Viber now released Debian binary: www.viber.com/products/linux/
You must have 64bit version of Ubuntu, Debian, Mint or ZorinOS to be able to install the Viber to your Ubuntu system.
Taggings:
Configuration solution for nginx on ubuntu
First, we need to select the Ubuntu as the image on our server.
After installing Ubuntu, we need to configure DNS on out domain. In case our domain is www.domain.com, we need to point it's DNS settings to Digitalocean's server. At our domain registrar, we point our domain to:
- ns1.digitalocean.com
- ns2.digitalocean.com
- ns3.digitalocean.com
ssh username@yoursite.com -p definedportsudo apt-get install nginxsudo service nginx startsudo mkdir -p /var/www/domain.com/public_htmlsudo chmod 755 /var/wwwsudo nano /var/www/domain.com/public_html/index.htmlsudo cp /etc/nginx/sites-available/default /etc/nginx/sites-available/domain.comsudo nano /etc/nginx/sites-available/domain.comsudo ln -s /etc/nginx/sites-available/domain.com /etc/nginx/sites-enabled/domain.comsudo service nginx restart
-
After configuring the DNS, we need to connect to our server with SSH command in terminal
After we are asked for the password, we will access our remote server.
When connected to the remote server, first thing we need to do is aces superuser privilege and instal nginx. We do it with the following command:
After this step, nginx will be installed but not running. In order to start the nginx service, we type into the terminal
Our nginx is now up and running. Now we need to create a virtual host and a folder which will contain our file. We do it wit the command
We need to change the permissions, so that everyone can read our files, but only root use can modify them. We do it with chmod command:
Nginx by default looks for the index.html file which we need to create, and put some content in it:
Now we need to create our virtual host file in nginx's site-available folder
Now we have our configuration opened in a tex editor, with some default values. Our new server requires the following configuration:
 server {

        listen   80; ## this is default HTTP port
root /var/www/domain.com/public_html;
index index.html index.htm index.php; ##this is the list of files nginx will search for
# Make site accessible from http://localhost/
server_name domain.com;
}
Now we save it and exit. We need to draw a parallel from available to enabled sites, so we do it with
In the final step, we need to restart our nginx server to apply changes. We do it with
.
At this point, our site should be up and running.
From what is seen here, configuring nginx is even easier in the beginning than configuring Apache.
For sites with a lot of workload and if we pay attention to our resources, it is a much better choice than Apache.
Use rsync and duplicity together with ssh-keys for remote secure backup
On Ubuntu:
First:
sudo apt-get install rsync
sudo apt-get install duplicity
Then:
rsync -avz * myuser@myremote.server.com:/backup/dir/
duplicity --verbosity info --allow-source-mismatch /data/to/backup/securly/also/with/encrypted/transfer/ rsync://myuser@myremote.server.com//backup/dir/for/encrypted/backups/
Finally:
To automate this with periodic execution, use "crontab"-entries, and/or add logic process functionality by using shell scripts.
Taggings:
Using the linux command line tool "curl" for accessing REST endpoints
So here is one way to do it (on an Ubuntu box):
1. Open a terminal
2. Install "curl": sudo apt-get install curl
3. Find out the web-adresses of your respective REST services and their needed inputs
4. Issue the following (exemplary) command:curl -v -s -H "X-Requested-Auth: Digest" --digest -u your_remotesystem_account:theverygoodpassword --form-string "workflowDefinitionId=full" -F "file=@media.zip" http://webappserver.tuwien.ac.at/ingest/addZippedMediaPackage &
5. Play around a bit to get the syntax/inputs right, check if the status of your webapp has changed, if not, retry
6. Be happy ;)
Taggings:
example of a smtp dialog
Connect to an arbitrary mail server on port 25 using telnet
telnet mail.eightloops.com 25
The mail server responds
Trying 176.9.117.182...
Connected to mail.eightloops.com.
Escape character is '^]'.
220 mail.eightloops.com ESMTP Postfix (Ubuntu)
Type into the smtp session:
ehlo eightloops.com
The mail server responds:
250-mail.eightloops.com
250-PIPELINING
250-SIZE 40960000
250-VRFY
250-ETRN
250-STARTTLS
250-ENHANCEDSTATUSCODES
250-8BITMIME
250 DSN
Tell the mail server who is the sender:
MAIL FROM: e1129560@student.tuwien.ac.at
250 2.1.0 Ok
Tell the mail server who is the recipient:
RCPT TO: thomas.preissler@eightloops.com
250 2.1.5 Ok
Tell the mail server that you want to deliver the actual data:
DATA
354 End data with .
Subject: test
Hello World!
Quit your message by using a single dot
.
250 2.0.0 Ok: queued as 13C248D49E5D
Quit the SMTP session
quit
221 2.0.0 Bye
Connection closed by foreign host.
Taggings:
CA Certificate
For Linux machines it is necessary to set the correct CA certificate as well. The installed certificates are stored at /etc/cert.
As many users are Using Ubuntu I give step-by-step instructions for this distribution. For other distros the steps are similar.
- Open the Network Connection Settings-dialogue either via "System Settings" or via the Network-Icon on the menu bar on top of the screen
- Select your eduroam-connection from the list of connections and choose "Edit"
- Choose the "Wi-Fi Security"-tab.
- Have a look at the "CA certificate"-settings. The certificate Deutsche_Telekom_Root_CA_2.pem has to be set. This can be done by just klicking on the button right of the label "CA certificate". The machine shall search in the right folder automatically. If not, choose
/etc/cert
The attached picture shows the correctly filled in Settings dialogue.
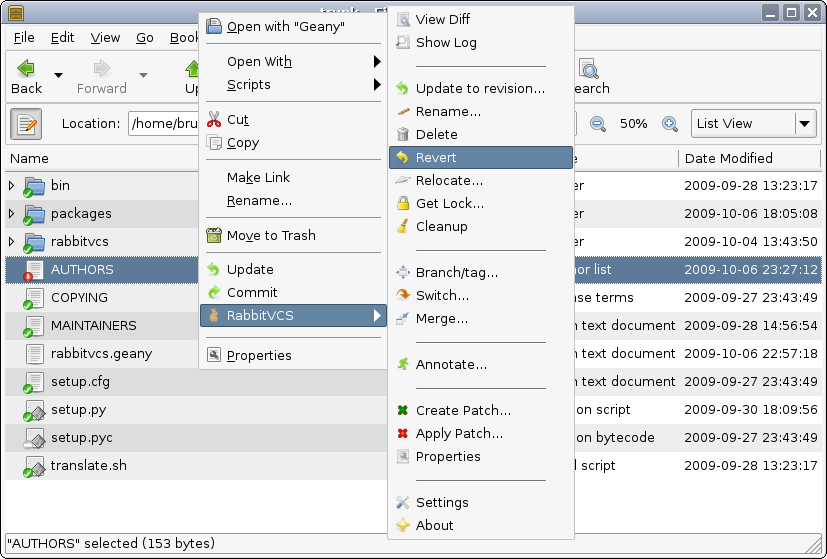
RabbitVCS a graphical tool for version control on linux
If you know TortoiseSVN on windows systems you will recognize strong similarities in RabbitVCS. It provides a nice interface which is integrated into nautilus, the default file manager in gnome.
Install it on Ubuntu/Linux Mint:
sudo apt-get-repository ppa:rabbitvcs/ppaAfter installation you may need to restart some programs to activate the interface (e.g. nautilus)
More information on installation of RabbitVCS can be found here:
http://wiki.rabbitvcs.org/wiki/install/ubuntu
Screenshot of RabbitVCS integration:
http://wiki.rabbitvcs.org/wiki/_media/about/context_menu.png
Logo of RabbitVCS:
http://upload.wikimedia.org/wikipedia/en/6/6e/Rabbitvcs.svg
Taggings:
Add Source Control Integration to Mantis 1.2.X
Due to the lack of a built in solution or a (simple) plugin which connects a SVN-repository and Mantis, the connection of these two system could be a bit tricky.
Preconditions
- Install an Ubuntu 12.04 LTS
- Install SVN
- Install WebSVN
- Install Mantis 1.2.X
- Install Source Control Integration plugin
- Install Subversion Integration plugin
- Install Subversion / WebSVN Integration plugin
These system could be but must not be on the same host.
Configuration SVN
Add a post commit hook to your SVN-repository with the following code:
#!/bin/sh

REV="$2"
URL="http://mantis.example.com/plugin.php?page=Source/checkin"
PROJECT="ProjectName"
CURL=/usr/bin/curl
${CURL} -d "repo_name=${PROJECT}" -d "data=${REV}" -d "api_key=4289def1asdc402abf71de1d" ${URL}
Configuration WebSVN
Add the repository to WebSVN, which is use to see the source of the code and the diffs of the commits.
- Change file:
PATH_TO/websvn/include/config.php - Add to file:
$config->addRepository('$NAME', 'svn://URL_TO_REPOSITORY', null, '$SVN_USER', '$SVN_PASSWORD');
$NAME ... the repository name
$SVN_USER ... the username of a svn user
$SVN_PASSWORD ... the password of an svn user
Configuration WebSVN
Add the repository to Mantis.
- In Mantis klick on Repositories in the Menubar
- Add the Name of the Repository (the same name which was used in WebSVN)
- Choose webSVN as Type
- Klick Create Repository
- See attached screenshot for further repository properties
Commit message commands
- use "issue $TICKET_NUMBER" to assign a ticket to a commit
- use "#fixes $TICKET_NUMBER" to set the status of a ticket to resolved